In today's world, social media platforms have become an essential component of any successful marketing strategy. Facebook, being the most widely used social media platform, provides businesses with the opportunity to reach out to their target audience effectively. And, Integrating your Facebook business account with NotifyVisitors can further enhance your targeting and marketing efforts.
In this article, you will learn how to connect your Facebook business account with NotifyVisitors to reach out to people on Facebook who are already familiar with your business. By integrating these two platforms, you can leverage the data you have collected with NotifyVisitors such as your customer's shopping behavior, email engagement, and more to create a Custom Audience on Facebook. This will enable you to personalize your ads and achieve your marketing goals more effectively.
Integrating Your Facebook Business Account With NotifyVisitors
Before we start the integration process make sure you have a
› Facebook Business Manager Account
› Facebook Business Page
› Facebook Ad Account
› And An Audience List
Click here to learn more.
Note
You can create multiple Ad accounts and audience lists, and while creating a facebook campaign in NotifyVisitors, you get the option to choose one.
Once you have it all ready, you can follow the steps below to integrate your facebook business account with NotifyVisitors.
Step 1: Navigate to the “Settings” section in the NotifyVisitors panel and select "Facebook" under channels.

Step 2: Click on the "Connect to Facebook advertising" button, and a permission pop-up will appear with your Facebook business name. Click on "Continue," and all your Facebook pages will appear. Select the page you want to connect and click "Next."

Step 3: Here, another permission window will appear, showing the type of data NotifyVisitors can access. It's recommended not to turn off any permissions to avoid any errors while creating Facebook ads campaigns. Review the permissions and click "Done."

Step 4: Finally, click "OK" to close the window, and your account will be connected.

Creating Facebook Ads Campaign
In this step, we will discuss how you can create a campaign that syncs your NotifyVisitors user data with your Facebook ads account. By doing so, you can target specific users based on their interactions with your website or app.
Follow these steps to create such campaign:
Navigate to the “campaigns” section from the left panel and then select “retargeting ads,” next click on “create campaign" and select facebook.

1. Add Recipients
Step 1: In the first recipient page, fill in the “campaign name” and add a “campaign label” if desired.

Step 2: Under the “Target Segment,” select the “user segment” created in NotifyVisitors that you want to sync with facebook audience. You can also add multiple segments by clicking the “+” button and selecting another segment with a different rule.

You also have the option to exclude specific segments of users from being targeted in your Facebook advertising campaign. This can be done by adding those segments to the "exclude users from these segments" section, ensuring that they will not receive the ads.
Step 3: Under the Facebook audience section, select your Ads account. If you want to create a new ad account, you can do so from Facebook, and it will appear on this list.

Once you have selected your Ads account, proceed to the next section and choose your desired audience list. If you wish to create a new list, enter the name of the new list, and the drop-down menu will provide you with the option to create a new audience list with that name. Select this option to generate the audience list in your Facebook ads account, which can be viewed from your Facebook account as well.
Finally, click on “continue to review” to proceed further.
2. Review Page
On this page, you can review the campaign details such as the campaign name, campaign label, audience (segments selected by you) and facebook audience.

If everything is correct, click on the “continue to Send/Schedule” button to proceed with sending or scheduling the campaign.
3. Sending/Scheduling Campaign
Here you have two ways to send a campaign - “One time” and “Recurring.”
› One-time Schedule
For one-time scheduling, you have two options: "schedule now" or "schedule later."
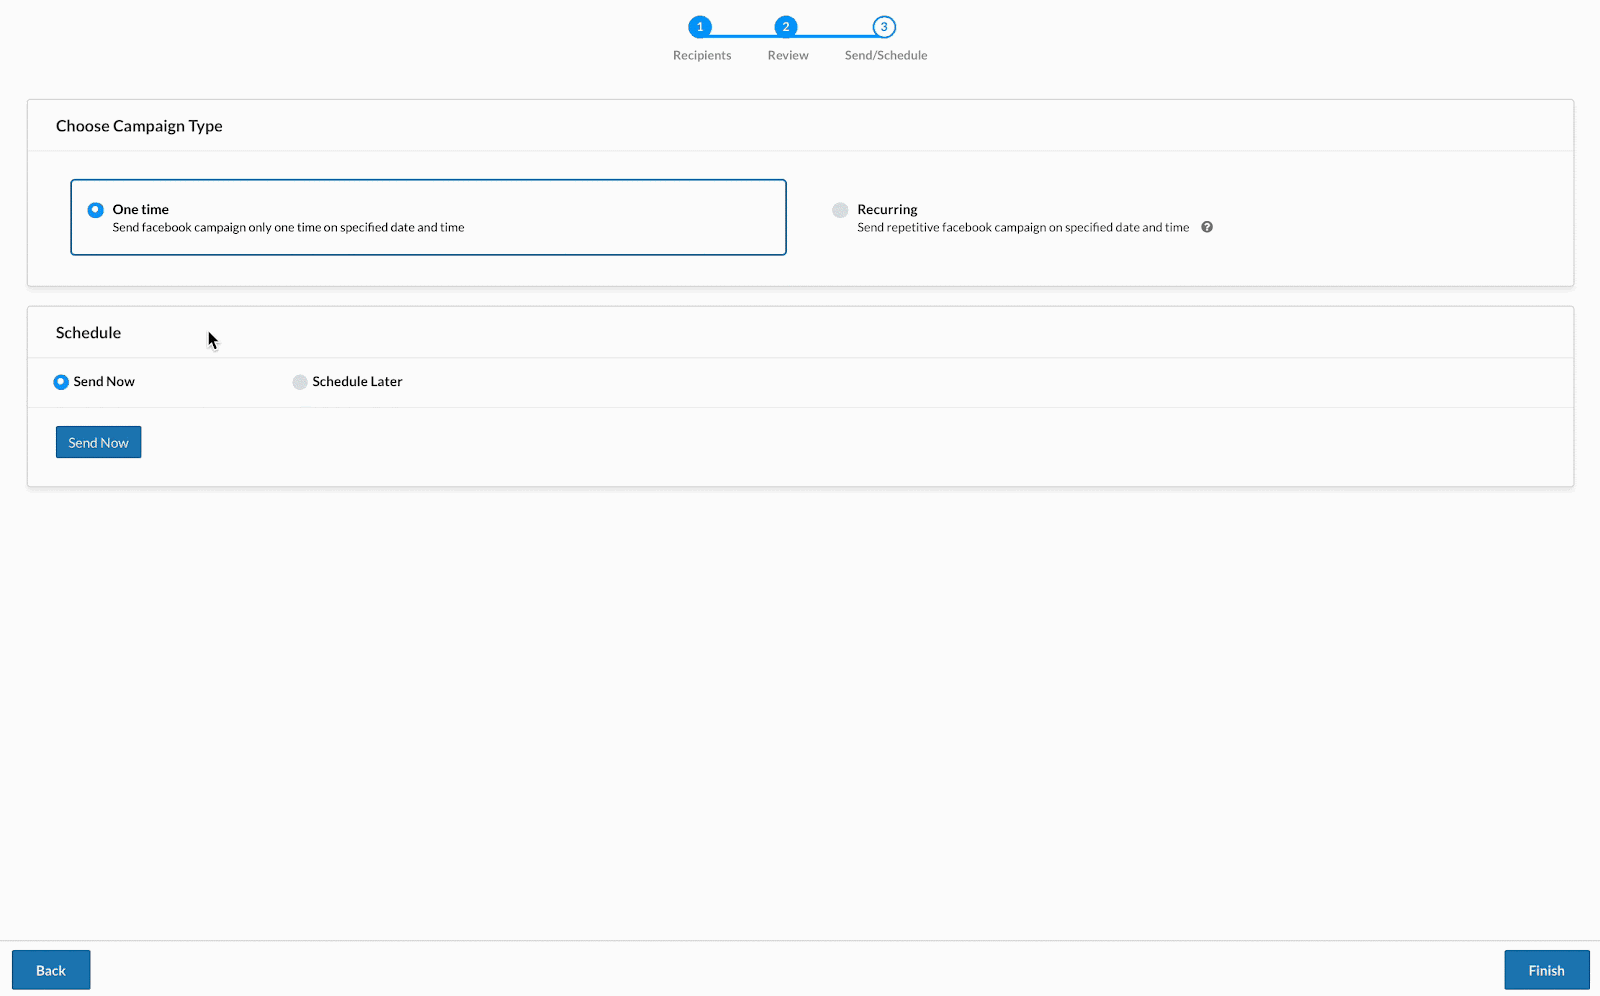
➦ If you choose "schedule now," the campaign will be created and your audience will start syncing immediately.
➦ However, if you want to schedule the audience synchronization for a later time, then you can use the "schedule later" option.
When you select "schedule later," you will be presented with scheduling options. You can choose the time zone, date, and time when you want to schedule the synchronization process. After making the selections, click on "schedule."
› Recurring Facebook Campaign
Moving on to the recurring Facebook campaign option, this feature allows you to automatically sync new users that entered in your segment with your facebook audience list on dates and times specified by you.
At first, you have the option to set the campaign as active or inactive. This feature is particularly useful if you want to pause the recurring campaign for some reason without having to recreate it. For instance, if you have an active recurring campaign and you need to pause it for a few days, you can simply click on the inactive button and then on the “update” button. This will pause the campaign. When you are ready to resume it, simply click on the active button and then update button again to make it live.

To set up a Recurring Facebook Campaign, select the "active" status option and enter your time zone. Then choose a recurring schedule from the drop-down menu, such as monthly, weekly, or daily. After this, select the date and time you want to send your campaign on. You can also add multiple dates and times for the campaign to be sent.
For example, if you select the monthly option and add two different dates, the audience will be synced twice a month on those dates. If you select the daily option, the audience will be synced daily at the specified time.
Additionally, you can choose an end date for your recurring campaign. Once you've made all the necessary selections, click on "update," then "finish," and your campaign will be created for the selected user segment.
Note
When you opt for the recurring campaigns feature, new users who are added to your segment list in NotifyVisitors will be automatically synchronized with your audience list on Facebook every time the campaign is repeated. However, if a contact is already on Facebook, they will not be removed from your audience list when they no longer fit the rule in the NotifyVisitors segment and are removed from the segment.
Check Synchronization On Facebook
Once your campaign is active, the user segment you have selected will be synchronized with a Facebook audience list. To view the synced audience list, log in to your Facebook business account and click on the three-line options button located on the left sidebar. Next, select the "Audiences" icon and choose your Ads account from the top-right dropdown menu.
Upon selecting the Ads account, you can view the list of audiences that you have created. To access more options, click on the name of the audience and then select "History" from the window that appears.
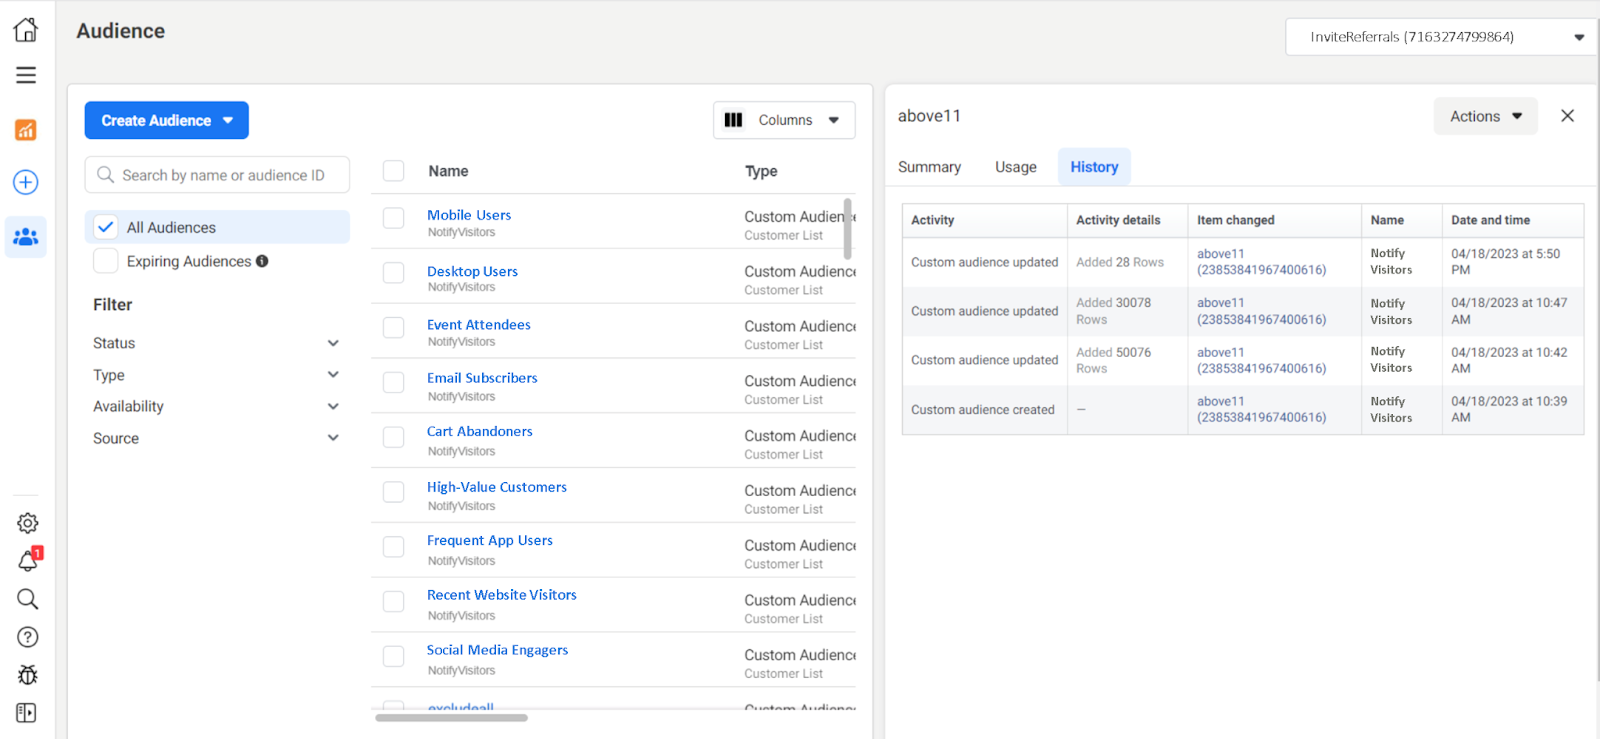
The history list displays the logs of campaigns created and the total number of users that have been synced with this audience, along with the date and time of synchronization.
Facebook Analytics
As we’ve explained above, that you can view the total number of users synced in audiences history in facebook, but it does not reveal the total numbers of users that were actually sent and how many among them were discarded.
To check total users sent and various other options we can use the facebook analytics feature provided in the NotifyVisitors panel.
To view analytics go to the “campaign” section from the left panel and select “retargeting ads”. Next, click on facebook and here you can see all facebook campaigns created by you. To view analytics of any campaign simply click on the three dotted button right next to the campaign name and click on “analytics.”
› Campaign Info
This tab displays comprehensive information about your campaign, including its name, label, audience, and Facebook audience.

You can also find scheduling details, such as the campaign's distribution, scheduled date, and current status, at the bottom of the page.
› Facebook Stats
Next, on the facebook stats tab you have the option to view total sent, total synced and total discarded users.

Total sent - This option shows the total number of users you’ve sent campaign to.
Total synced - This option shows the total number of users that are actually synced out of your total sent.
Total discard - This option shows the total numbers of users discarded out of your total sent.
There may be several reasons why some users are discarded when you send your campaign, but one primary reason is their email addresses not being registered with Facebook.
Conclusion
In conclusion, integrating your Facebook business account with NotifyVisitors can help enhance your marketing efforts and reach out to your target audience more effectively.
By leveraging your NotifyVisitors user data to target specific users based on their interactions with your website or app, businesses can make the most out of their Facebook advertising and reach out to a wider audience.
Connect your facebook business account today and get access to all these features!
Was this article helpful?
That’s Great!
Thank you for your feedback
Sorry! We couldn't be helpful
Thank you for your feedback
Feedback sent
We appreciate your effort and will try to fix the article