NotifyVisitors provides a crucial feature to boost your sales by allowing you to send personalized product recommendations through campaigns like email and web popups. To make this happen, it's important to sync your catalog with NotifyVisitors.
We offer two ways to do this:
1. Sync your catalog directly from your CMS platform.
2. Sync the catalog of your custom website by sharing the source URL.
Let’s explore how these methods work!
Synchronize catalog from CMS platform
This is the simplest method to sync catalog, but it’s only valid for CMS users. To do this, you first have to connect your store with NotifyVisitors. NotifyVisitors offers integration with various e-commerce platforms such as Shopify, WooCommerce, Magento, Wix, BigCommerce, etc. Click here to learn more about our various store integration options.
Once connected, navigate to Settings > Store Integration > CMS. Click on the 'Configure' button present adjacent to your connected e-commerce platform. For an example, we are going to use Shopify.

Next, scroll down to the bottom and make sure that the 'Sync Catalog Data' option is 'enabled.’ In case it isn't, enable it in order to sync and save the catalog within the NotifyVisitors database.

With this, you can directly access your e-commerce catalog from NotifyVisitors.
Sync catalog of your custom website by providing the source URL
If you're utilizing CMS platforms that aren't listed above or if you have your own website, you can still synchronize your catalog by sharing your site's source URL. Simply follow the step-by-step instructions below to sync your custom product catalog.
- Navigate to the Dashboard > Brand Assets > Catalogs.
- Click on the button titled 'Create Custom Catalog'.
- Upon doing so, a new frame (having the same title as the button you clicked on) will appear on-screen wherein you will have to specify certain details of your 'catalog's source' such as its name, URL, access credentials i.e., username and password, if required.
Note
Only XML and JSON file URLs should be entered within the 'Source URL' field, since the software will process URLs of exclusively these two file types.
- Click on the button titled 'Next', once you have entered the details.
- Upon doing so, a module named 'Manage Field Mapping' will appear (as illustrated) wherein you will have to map the attributes (that hold information pertaining to the products present in the catalog) existing in the XML/JSON file with the ones recognized and/or not recognized by the software.

The 'Manage Field Mapping' module has four columns namely:
- Field: All the attributes present within the XML/JSON file will get listed in this column.
- Data Type: This particular column contains a drop-down for each attribute listed in the 'Field' column. Through these drop-downs you can select the correct 'data type' for the corresponding attribute.
- String: A sequence of characters, used for text data.
- Boolean: Represents true/false or yes/no values.
- Integer: Whole numbers without decimal points.
- URL: A web address or link.
- Categories: A list of options or values (In this case groups of products such as electronics, clothing, etc.)
- Attributes: This column too holds a drop-down for each attribute listed in the 'Field' column. The dropdowns within this column list all the attributes recognized by the software and also the ones not recognized by the software, but present in the XML/JSON file, so that you may accurately map the right attributes with the ones listed in the 'Field' column.
- Required: You can use this option to turn on the fields you wish to sync.
Important Note
There are certain indispensable attributes, 'seven' in number, that are essentially required by the software to successfully sync a custom catalog. Their switches, present in the 'Required' column, are toggled 'on' by default and can’t be turned 'off'.
You can, however, toggle the switches 'on' or 'off' of all the remaining attributes. If for an attribute the switch is toggled 'on' then the software will sync and record the piece of information it holds and vice versa.
Map the attributes listed in the 'Field' column with their respective equivalents available in the drop-down(s) present in the 'Attributes' column. Then, click on the button titled 'Save Mapping'.

- Upon doing so, the new catalog will get created within the software and its syncing will commence.
That is to say, while syncing is underway, the catalog will get listed in the 'Catalogs' section of the software and it will display the catalog’s sync status as 'In Progress'.
In case the catalog gets synced successfully, then the software will automatically update its sync status from 'In Progress' to 'Completed'. If the catalog fails to sync, then the software will reflect the sync status as 'Error'.

Note
You can hover the mouse cursor over the 'Error' sync status to know the exact reason why a catalog failed to sync. In other words, the reason for a catalog's failed syncing, will appear within a 'tooltip', if you hover the mouse cursor over the 'Error' tag. The common reasons for a catalog's failed syncing are:
- API error.
- API has no data or there is a mismatch of data key.
- Internal error due to mismatch of the mapped product fields.
Once you learn the exact reason for the failed syncing, you may want to rectify the same by means of editing the details and/or the attribute mapping of your catalog. You may do so, by means of the 'Edit' option available for each catalog (described in the next section).

- Once you have addressed the reason for the error i.e., rectified the catalog's details and attribute mapping, simply click on the button titled 'Resync' so as to resync the catalog.
Upon clicking on the aforementioned button, the software will display a pop-up prompting you to confirm your decision. Click on the button titled 'Confirm'.

Important Note
Whenever you add a custom catalog in the software in the aforementioned manner, then you will also have to manually map or configure certain 'system events', 'three' in number, recognized by the software, so as to enable it to properly sync the product information present within the catalog.
The properly synced catalog can then be used to create 'Product Feed(s)' which in turn can be used to populate campaigns with specifically those products in which customers expressed their purchase interest. You will learn how to map the three 'system events' in the subsequent section.
Options available for a product catalog
Once you have created a catalog within the software, you will be provided with certain options or functionalities to view its contents, edit or reconfigure it, delete it etc. In this specific section we will delineate various options available to access and manipulate the added catalogs.
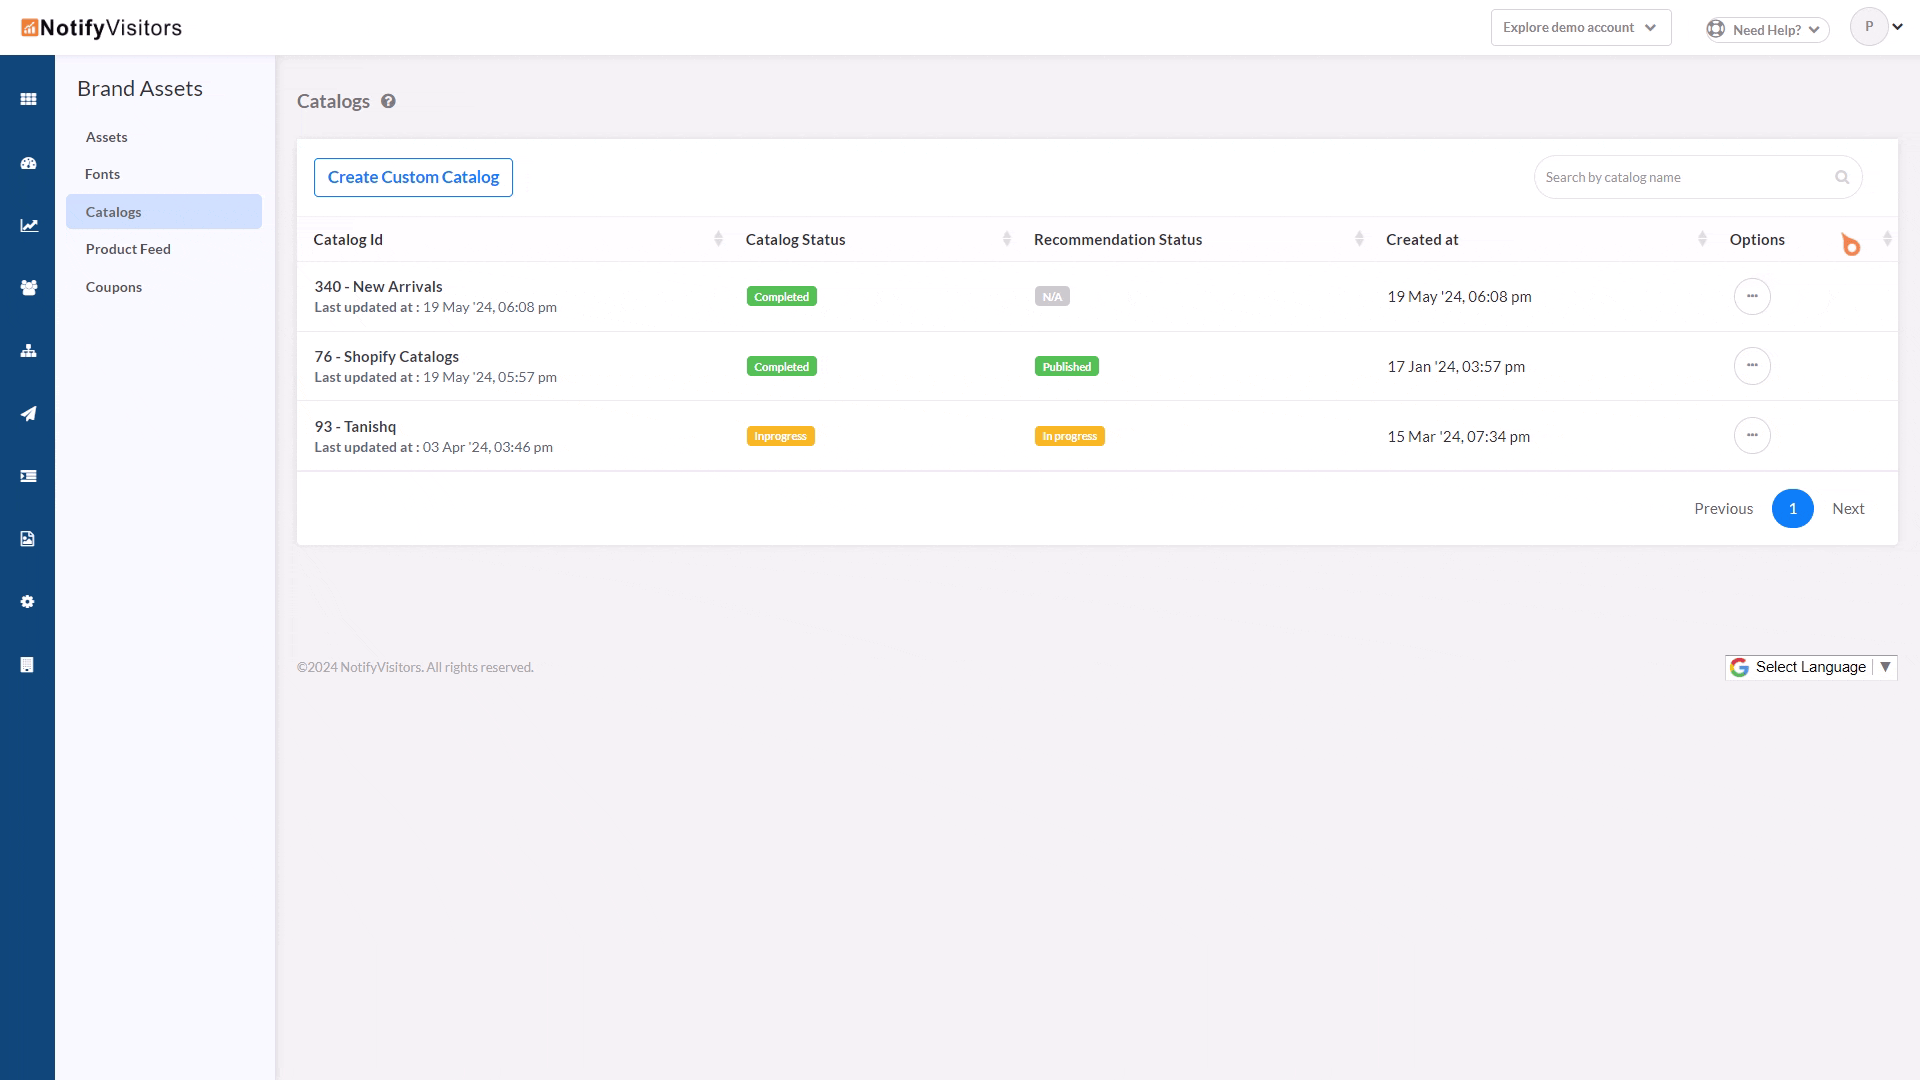
Once added, a catalog gets listed in the 'Catalogs' section of the software, as depicted in the screenshot provided below and all the information pertaining to it gets partitioned under four columns namely, 'Catalog ID', 'Catalog Status', 'Recommendation Status', 'Created At' and 'Options'.

It is in the last column titled 'Options' that for each catalog, there exists a button through which certain additional functionalities to manipulate the catalog can be accessed. Once you click on that three-dotted button, a drop-down listing the undermentioned 'four' options will appear on screen.
- View Items: Via this particular option you can view the products contained within the synced catalog.
Once you click on this option, a product page will appear on screen listing all the items present within the catalog which in turn can be filtered based on certain categories such as new arrivals, in vogue etc. and based on their current status i.e., 'Active' or 'Inactive'.
You can even click on individual items to gain access to much more granular information pertaining to them. As illustrated, click on the 'back button' to return back to the catalog page.
- Map Event: This crucial option enables you to manually map three 'system events', recognized by the software, namely 'Product View', 'Add to Cart' and 'Order Place', having 'Product ID' as their system attribute, with the three corresponding 'custom events' along with the equivalent product ID attribute, recognized by the source (i.e., online store, website, API etc.) from where the catalog is being synced.
It is imperative to map the three 'system events' with the appropriate 'custom events' right after creating a new custom catalog in order to enable the software to properly sync it and thereby successfully generate product recommendations.
Once you click on the 'Map Event' option, a pop-up will appear on screen via which you can, by means of a few dropdowns (check the illustration provided below), map the three 'system events' with the corresponding 'custom events' along with the analogous product ID/item ID attribute. Once you have mapped the events simply click on the 'Save' button present within the same pop-up.

In case you map the same 'custom event' against any two or all the three 'system events' and click on the 'Save' button, then the software will display an error message titled 'Duplicate event name selected'.
Meaning, since any two or all the three 'custom events' can not be identical, the software will display the aforementioned error message and you will have to map the correct 'custom event' for each 'system event'.

- Edit: This specific option enables you to modify the details as well as the attribute mapping of a previously saved catalog. You may intend to edit the catalog for various reasons such as syncing additional product related information, rectifying the cause of errors if the catalog fails to sync, updating catalog's details such as its name, its source URL etc.
Once you click on this option, a new frame titled 'Edit Custom Catalog' i.e, the renamed version of the 'Create Custom Catalog' frame will appear on-screen. Once you have rectified and/or updated the catalog's details and its attribute mapping, simply click on the button titled 'Resync' so as to resync the catalog.
![]()
Upon clicking on the aforementioned button, the software will display a pop-up prompting you to confirm your decision. Click on the button titled 'Confirm'.
- Delete: This option enables you to delete a saved catalog.
Once you click on this option, a pop-up will appear prompting you to confirm your decision. If you click on the 'Confirm' button present within the pop-up then the catalog will get permanently deleted from your NotifyVisitors account’s database.
Note
Once you delete a specific catalog then any 'Product Feed(s)' created using it will also get automatically deleted.

This is how you can synchronize a catalog in NotifyVisitors and thereby generate personalized product recommendations, to better engage both current and potential customers and as a result substantially enhance the conversion rate.
Was this article helpful?
That’s Great!
Thank you for your feedback
Sorry! We couldn't be helpful
Thank you for your feedback
Feedback sent
We appreciate your effort and will try to fix the article