There are various varieties of push notifications (standard, rich, etc.) for different devices such as android, ios, web with various types of scheduling notifications (one time. Recurring, and more).
To simplify the process, we have categorized push notifications based on the scheduling type.
There are 4 main categories containing various varieties of push with bunch of customization options
- One Time Push Notifications
- Recurring Push Notifications
- CSV Upload based Push Notifications
- Transactional (API) based Push Notifications
Let's discuss each of these in detail:
One Time Push Notifications
As the name suggests, with the "one-time" option, you can create a campaign to send a notification only once on a specific date and time.
This option is particularly useful when you want to deliver a specific message or announcement to your users without the need for ongoing or recurring notifications.
By utilizing the One Time Push Notifications feature, you can deliver timely and relevant information to your users, without overwhelming them with continuous notifications. It allows you to effectively communicate important messages while maintaining a non-intrusive user experience.
Example: A mobile game app offers daily rewards to its players. The app wants to notify the players about a special bonus reward available only for today. In this scenario, using a one-time push notification would be more effective and appropriate.
To send one time push simply select this option and after selecting, you will have the opportunity to choose your desired audience by selecting either "send to all users" or "send to users in multiple segments." If you choose the latter, you'll have the option to specify the segments whose users you want to include in the campaign. Additionally, you can also choose segments whose users you want to exclude from the campaign.
After choosing your desired audience type, proceed by clicking on "create campaign." You will then be prompted to select the type of notifications, such as standard, rich, etc, followed by a range of customization options.
Scheduling One Time Push
After completing customization of the push notification settings using the provided articles, at last you will find a variety of scheduling options in the "Schedule Notifications" tab to determine when the notifications should be sent.
Let’s discuss each of these options in detail -
Schedule Notification Time: This option allows you to choose whether to send the notification right away or schedule it for a later time. If you choose to schedule it, simply select the desired date and time for sending the notification.

Resend Notification: This feature allows you to create a resend notification schedule in case the user didn't receive the initial notification or didn't click on it.
To set this up, click on "add stage" and choose a condition to trigger the resend, i.e, "The user didn't receive the notification" or "The user didn't click the notification." You can also select both conditions if needed. Next, specify when you want to resend the notification after the initial one. You can choose to resend it after 1 day up to a maximum of 7 days. Select the desired time and your timezone, and click next.

Then click on "create notification," and an identical notification to the original one will be generated for the resend campaign. If desired, you can modify the description and media of the notification at this stage. Finally, click on "save and continue" to create the resend campaign.
Recurring Push Notifications
Recurring notifications play a crucial role in engaging users over an extended period and maintaining regular communications. They are particularly useful when you need to send notifications to users at regular or specific time intervals. For instance, you can use recurring notifications to send monthly reminders to customers to purchase products from your store, provide daily tips or updates to users..
The process to create recurring notifications is similar to that of one-time notifications. To begin, create a new Android push campaign and select the “recurring” option, next follow the same steps as mentioned earlier to fill in the campaign details.
Scheduling Recurring Push
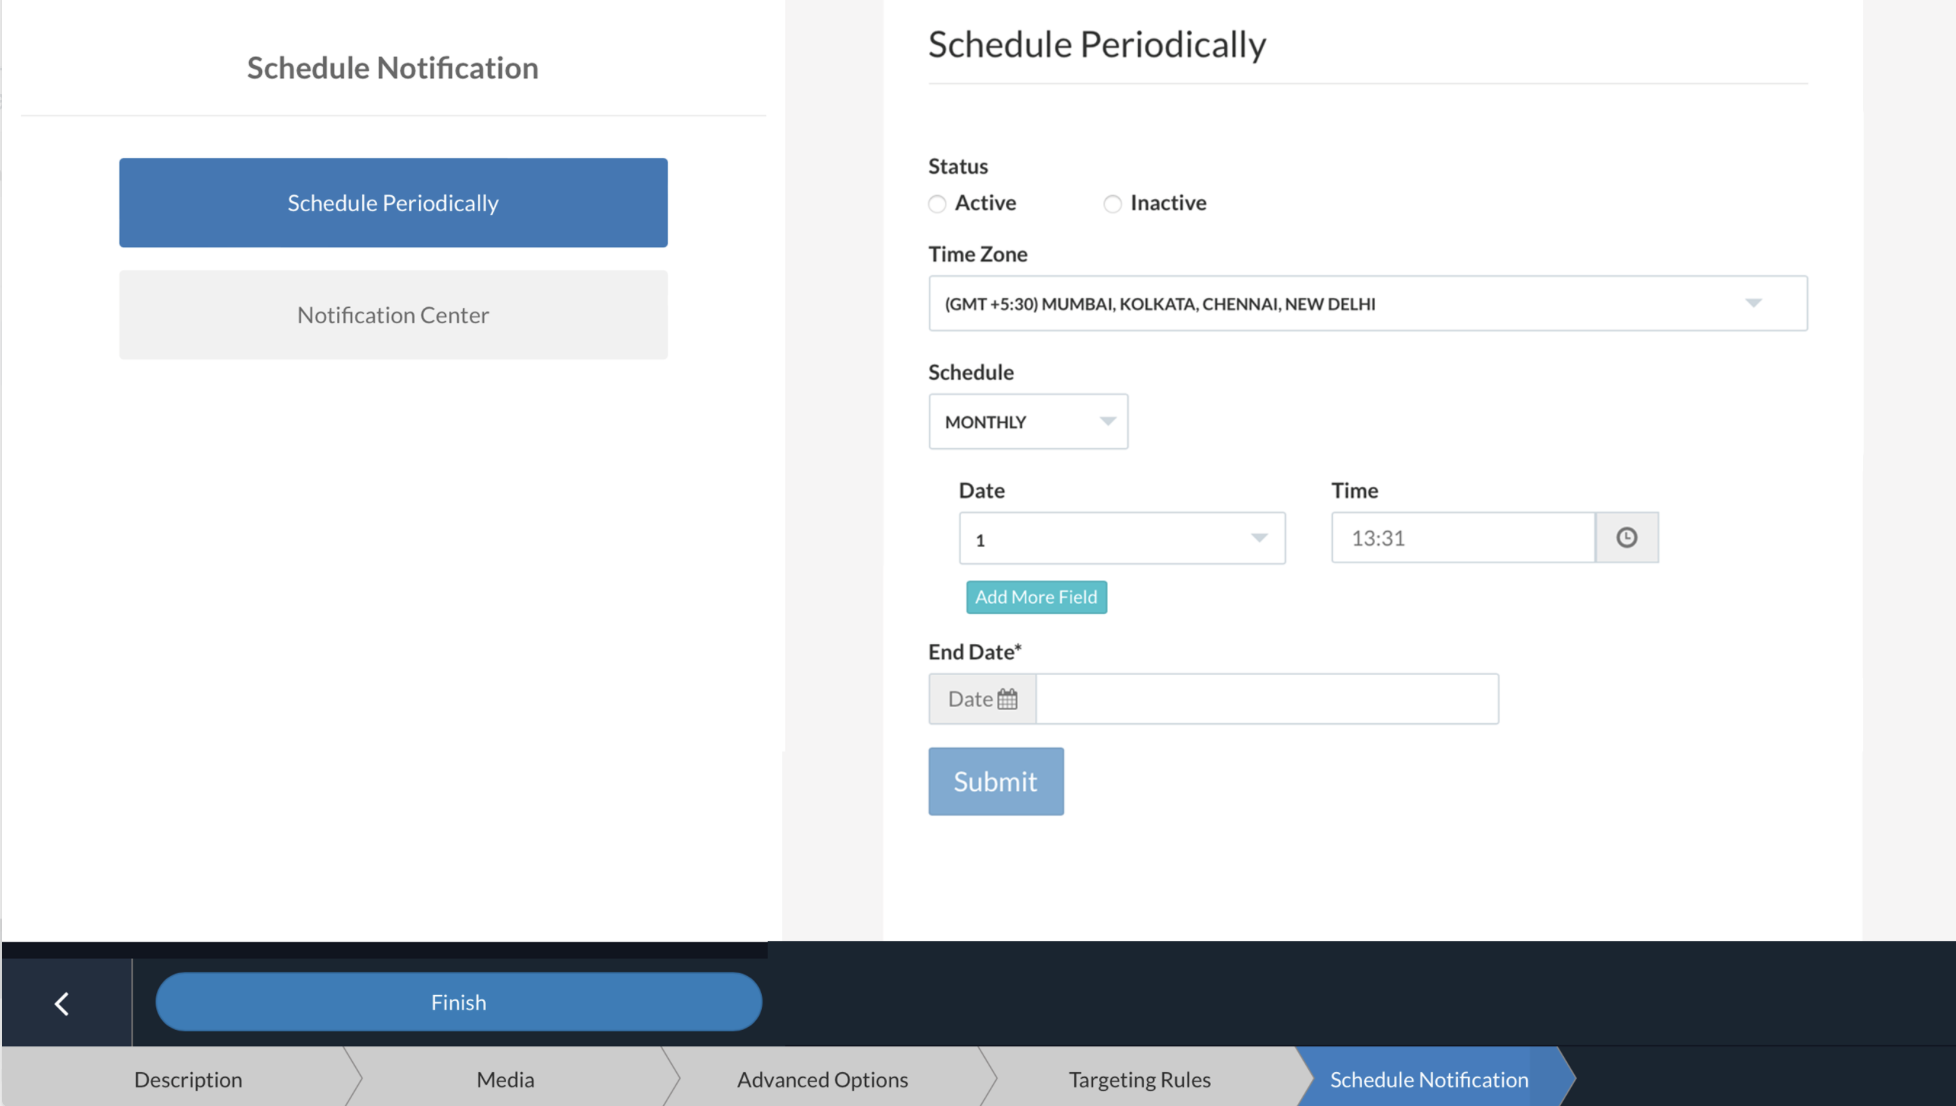
At last, In the "Schedule Notifications" section, you will notice a slight difference. Instead of the "Schedule Notification Time," there is an option called "Schedule Periodically" since recurring notifications involve sending notifications at regular intervals.

To set up recurring notifications, start by selecting the status as "Active" if you want to enable the recurring schedule. If you don't wish to start sending recurring notifications immediately, you can keep the status as "Inactive" and activate it later by editing the campaign whenever you're ready to send.
Next, choose the desired timezone for scheduling the recurring notifications. Then, select the schedule period - daily, weekly, or monthly and specify a specific date and time for the recurring schedule.
Finally, select the end date for your recurring campaign. This will determine the duration for which the recurring notifications will be sent.
CSV Upload based Push Notifications
CSV Upload based push notifications provide a convenient method for sending targeted and personalized notifications to a specific group of users. This feature allows you to upload a CSV file containing user data, such as email addresses, user IDs, or any other relevant information. By leveraging this data, you can create campaigns that deliver notifications to specific recipients identified in the uploaded CSV file.
To begin, navigate to the campaign section in the panel's left menu and click on "Create Campaign." Then, select "Android Push" and choose the CSV upload method.
The process for creating a CSV-based campaign is similar to the one-time scheduled notifications described earlier. After selecting the CSV upload method, choose your desired notification type (standard, rich, etc.) and fill in the necessary details as outlined in the previous steps.
Scheduling CSV Upload based Push
And, In the "Schedule Notifications" tab, you will find an "Upload Subscribers" option instead of the "Schedule Notification Time" field. This is because, in this case, you must first upload a list of users to schedule the notification time.

To upload the user list, either drag and drop the CSV file onto the cloud icon or click the cloud icon and select the file from your computer. The CSV file should be in the "csv" format and must include columns for User ID, Android ID, and Subscription ID.
After uploading the user list, you will need to map the fields to specific attributes. For example, you would select the User ID column and map it to the user ID attribute. Similarly, you would select the Android ID column and map it to the Android ID attribute. Once you have completed the field mapping, click on "Next."
In the next step, you will have the option to set the schedule time for the notifications. Choose the desired timezone and specify the schedule time accordingly. Finally, click on "Submit."
Transactional API
Under transactional API when a specific event or transaction occurs in your application or system that requires sending a notification, you trigger the API link request. This can be done through a server-side call or by invoking the API directly from your application code.
Once the API request is made, NotifyVisitors receives and processes it. NotifyVisitors handles the request and ensures that the notification is delivered to the intended recipient's device or platform.
Creating a transactional API-based notification campaign follows a similar process to the one-time scheduled notifications campaign. You access the campaign section in the panel's menu, select "Create Campaign," choose "Android Push," and opt for the Transactional (API) method. From there, you proceed with selecting the notification type and providing the necessary details, as explained in the previous steps.
However, you will notice that under transactional API based campaigns, schedule notification options are missing because such notifications are not sent on a predefined schedule. Instead, they are sent to individual users in real-time based on specific events or actions. For example, a transactional notification may be sent when a user requests a password reset.
Additional Resources
Was this article helpful?
That’s Great!
Thank you for your feedback
Sorry! We couldn't be helpful
Thank you for your feedback
Feedback sent
We appreciate your effort and will try to fix the article