Introduction:
Creating onsite popups can seem like a daunting task, but it doesn't have to be. With the right tools and approach, you can create effective popups that will help you boost conversions, and increase customer engagement on your website.
In this article, we will be covering the step-by-step process of creating onsite popups, from defining the purpose of the popup to testing and optimizing it for maximum effectiveness. We will also be discussing the various tools and techniques available for creating popups and providing tips and best practices for designing and implementing them on your website.
Effective Onsite Popup Creation: Strategies and Techniques
Whether you're new to creating onsite popups or looking to improve your existing popups, this guide will provide you with the information you need to create effective popups that will drive results for your business.
Step 1: Define the purpose of your popup
Defining the purpose of your popup is crucial to creating an effective one. Without a clear goal in mind, it can be difficult to design and create a popup that resonates with your audience and achieves the desired results.
For example, if your goal is to promote a special offer, your popup should be designed to showcase the offer and encourage visitors to take advantage of it. This may include an eye-catching image, a strong headline, and a clear call-to-action. On the other hand, if your goal is to promote a new product the popup design should be simple and easy to understand, with a brief product description that highlights its benefits.
To gain a comprehensive understanding of the different types of onsite popups, we recommend reading our informative article “Exploring The Various Forms Of Onsite Pop-ups: A Guide.” Click here to access it and explore the various options available to you. This will provide you with valuable insights and help you make an informed decision on which type of popup will best suit your needs and goals.
Once you have a clear understanding of the purpose of your popup, you can then use this information to guide the design and creation process.
Step 2: Choose a right popup tool
Selecting the appropriate popup tool is a crucial factor in crafting a successful on-site popup. Our team of experts at NotifyVisitors understands this and has thus, developed a user-friendly drag-and-drop tool to simplify the process and eliminate any difficulty or stress in creating the ideal popup for your needs.
This tool offers a simple and intuitive interface, making it easy for anyone to create a popup without any technical skills. It also offers a wide range of customization options, including the ability to change colors, fonts, and layouts, as well as add images, videos, and other media. This makes it easy to create a popup that matches your website's design and branding, ensuring that it blends seamlessly with your existing website.
Step 3: Design your popup
When designing your popup, it's important to keep it simple and easy to read. Use clear and compelling headlines, and make sure that the form is easy to fill out. Also, make sure that the design of the popup is consistent with the overall design of the website and that the language is clear and simple.
Designing an onsite popup using NotifyVisitors' drag-and-drop tool is a simple and straightforward process. Here are the basic steps you need to follow:
1. Select Onsite from the left panel, then with the popup selected from the left pane, Click the "CREATE NEW POPUP" button.
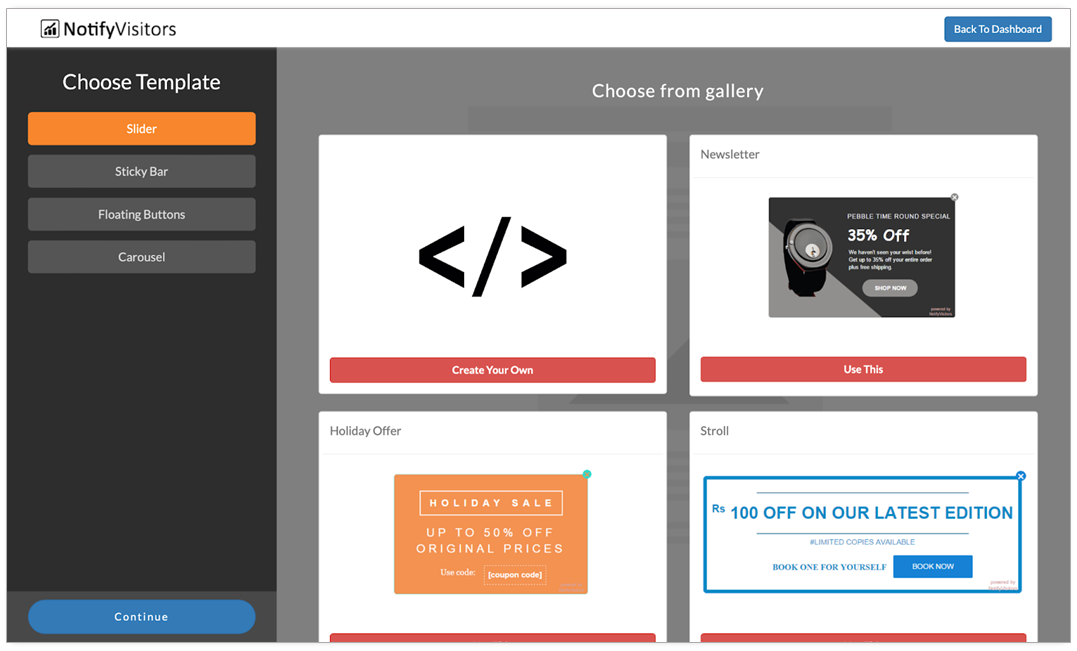
2. Choose the type of popup you want to create, such as a slider, sticky bar, floating buttons, or carousel, and click continue. After clicking continue, various types of templates will be revealed; choose the one you like, or click "Create Your Own."
3. Use the drag-and-drop tool to customize the design of your popup. This includes selecting a layout, adding text, images, videos, and other media, and customizing the colors, fonts, and other design elements.

4. Once your design is complete, click on the "Save and Continue" button located in the top right corner. This will take you to the Settings tab, where you can customize various aspects of your pop-up, such as adding a timer for the close button, setting an auto-close timer, selecting animation styles, adjusting border and close icon colors, and more.
Experiment with the various options available in this tab to find the best configuration for your popup.
5. Preview your popup to ensure that it looks and functions as intended.
Kindly take a look at our article "How to Design Onsite Popups" for a more in-depth understanding of the process.
Step 4: Choose the right trigger
Popups can be triggered by a variety of actions, such as when a user scrolls to a certain point on the page, clicks a button or is about to leave the website. Choosing the right trigger will ensure that your popup is shown at the right time, increasing the chances of conversion.
NotifyVisitors' advanced targeting option is a powerful trigger tool that allows you to show the right popup to the right user at the right time, increasing the chances of conversion.
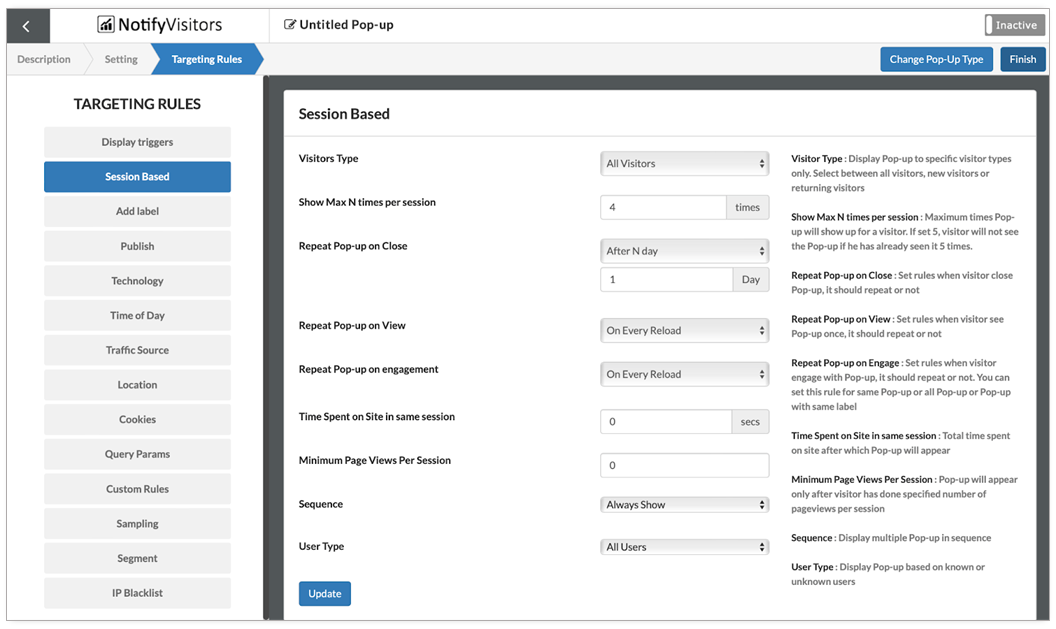
With this feature, you can target specific segments of your audience based on a variety of criteria, such as their location, device, referral source, and more. This allows you to create highly targeted campaigns that are more likely to resonate with your audience and achieve your desired results.
For example, you can use targeting options to show a special offer to visitors who are browsing your website on a mobile device or to show a survey to visitors who have been on your website for a certain amount of time. You can also use targeting options to show different popups to different referral sources, such as social media or search engines, or to show different popups to visitors from different countries or regions.
For an in-depth understanding of Targeting Rules, please refer to our comprehensive article, "How To Optimize Your Onsite Campaigns With Targeting Rules."
Step 5: Test and optimize
Once your popup is live, it's time to evaluate and improve it to determine the most effective approach. Although this step is optional, testing your popup can help you make informed decisions and optimize its performance. If you prefer, you can skip this step and move directly to step 6.
To test your popup, use A/B testing to see which versions of your popup perform best and make changes accordingly.
A/B testing is a method that enables you to compare the effectiveness of different variations of your Popup by showing one variation to a portion of your visitors and a different variation to another portion of your visitors. The objective of this approach is to determine which variation of the Popup is more effective in generating leads.
The process is straightforward. By utilizing our drag-and-drop tool, you can effortlessly create different variations of your popup. If you want to save time, you can duplicate the already existing popup and make the required modifications.
Next, activate one variation of the popup for a limited period, deactivate it, and repeat the process with the other variations. The objective is to compare the performance of each variation and identify the one that produces the best results.
You can use our analytics tool to track the performance of each version such as number of views, clicks, and conversions. By comparing these metrics, you can determine which version of your popup performs best. Once you have the results, you can then make the most effective popup live on your website.
Step 6: Make sure the popup is mobile-friendly
Ensuring that your popup is mobile-friendly is crucial for providing a good user experience for your mobile visitors. This means that your popup should be designed to be easily readable and navigable on smaller screens, with font sizes and button sizes that are easy to tap on. Additionally, the popup should be optimized for different screen resolutions and orientations, so that it looks good on both portrait and landscape views. It's also important to make sure that the popup is responsive and adjusts to the size of the screen, so that it takes up the appropriate amount of space and doesn't cover up important content.
By making sure that your popup is mobile-friendly, you can ensure that it is accessible to all users, regardless of their device or screen size.
Also, by utilizing A/B testing here, you can experiment with different variations of your popup to determine its effectiveness on mobile devices, ensuring that your popup provides an optimal user experience for visitors accessing your website through their mobile devices.
Conclusion:
In conclusion, creating an effective onsite popup can be a simple and effective way to improve your website's performance and drive results for your business. By taking the time to define the purpose of your popup, choose the right tool, design, and test it, you can create a popup that is tailored to your specific needs and goals.
Additionally, it is crucial to ensure that the popup is mobile-friendly, as more and more users are accessing the internet on mobile devices. By keeping these key points in mind, you can create popups that are engaging, effective, and drive conversions and growth for your business.
Was this article helpful?
That’s Great!
Thank you for your feedback
Sorry! We couldn't be helpful
Thank you for your feedback
Feedback sent
We appreciate your effort and will try to fix the article