A successful email marketing campaign must include an email signup form. Customers are accustomed to filling out sign-up forms, therefore even minor design flaws or errors in the data you request can have a significant impact on your conversion rates. Only a credible signup form will help you in expanding your email list.
NotifyVisitors provides the Drag and Drop tool to design Signup Forms in the best possible manner. The editor helps in bringing the best outcome when designing a signup form from scratch or using pre-designed themes from the gallery.
In this article, you will learn about -
› Types of signup form
› Complete process to design signup forms.
Types of signup form
Let’s begin with the process of designing a signup form-
Once you click on create a signup form, a new modal will appear where you will have to select a form as per the requirement of your website. NotifyVisitors provide you with 2 types of Signup forms namely:-
1. Slider 2. Sticky Bar
Slider
A slider signup form is a type of user interface element that can either slide out as a small popup window or be embedded in a specific section of a webpage.
When you select the slider signup form-
› Click on the continue option available at the bottom left,
› A new screen shall follow where you will have to choose from the gallery whether you want to create your own slider signup form or use predefined themes for the same 
Sticky Bar
A sticky bar signup form is a narrow strip that remains fixed to the top or bottom of a webpage, usually even when the user scrolls the page.
› When you select sticky bar signup form, the following screen shall follow

› Now, click on “continue” button and further select the suitable theme or create your own sticky bar signup form.

Creating Sign Up Form
Creating a signup form with NotifyVisitors drag and drop tool is a very easy process. Follow along the instructions below to create one for yourself.
For this example we are going to choose the slider category and we’ll create a form from scratch. To do this click on “create your own.”
Step 1: When you click create your own, the following window will appear. Where you have to fill in the form title, select the position of form, and select a segment.
You can either select the existing segment or can create a new one. If you want to learn how to create a new segment click here.
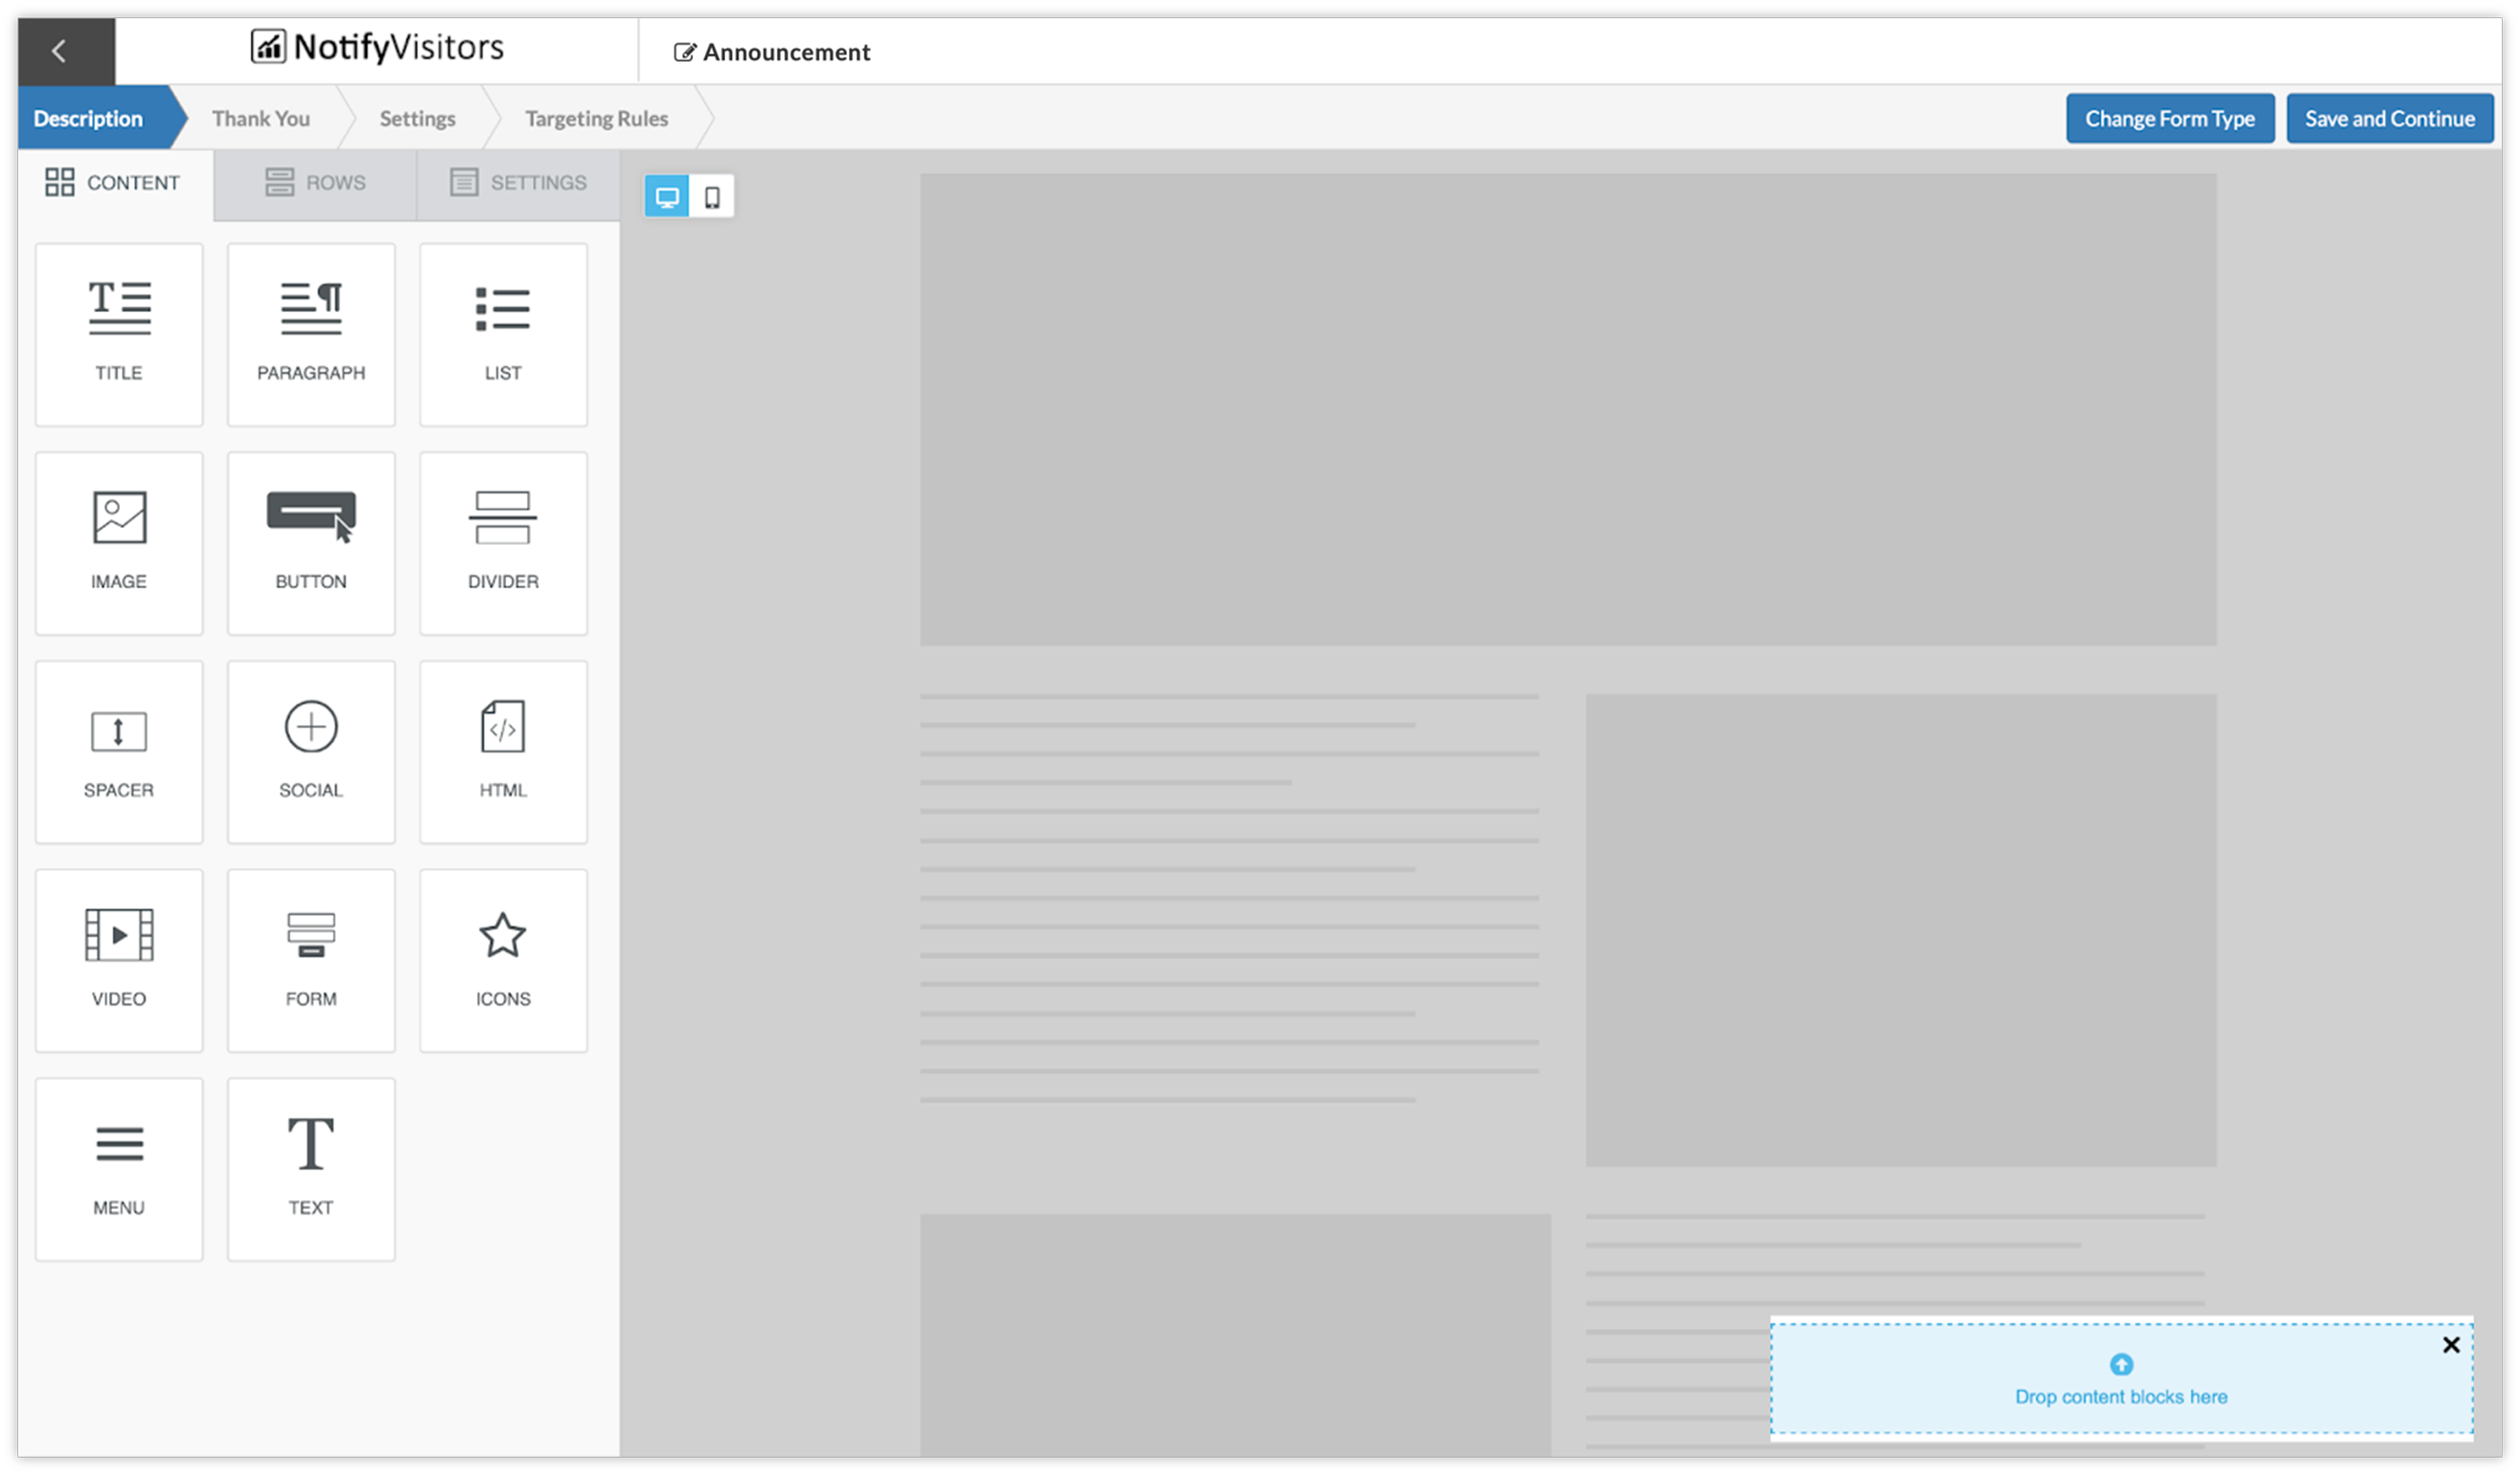
When you click on create, the following screen shall follow. Over the description tab you can start with the designing of your own signup form using the drag and drop editor.
You can also click on the change form type button at the top to change the dimensions of the form. And click on embedded if you want to embed this form on your website. Click here to learn more about embedding signup forms.
Step 2: Drag and drop the form tool from the contents and click on “edit form.”

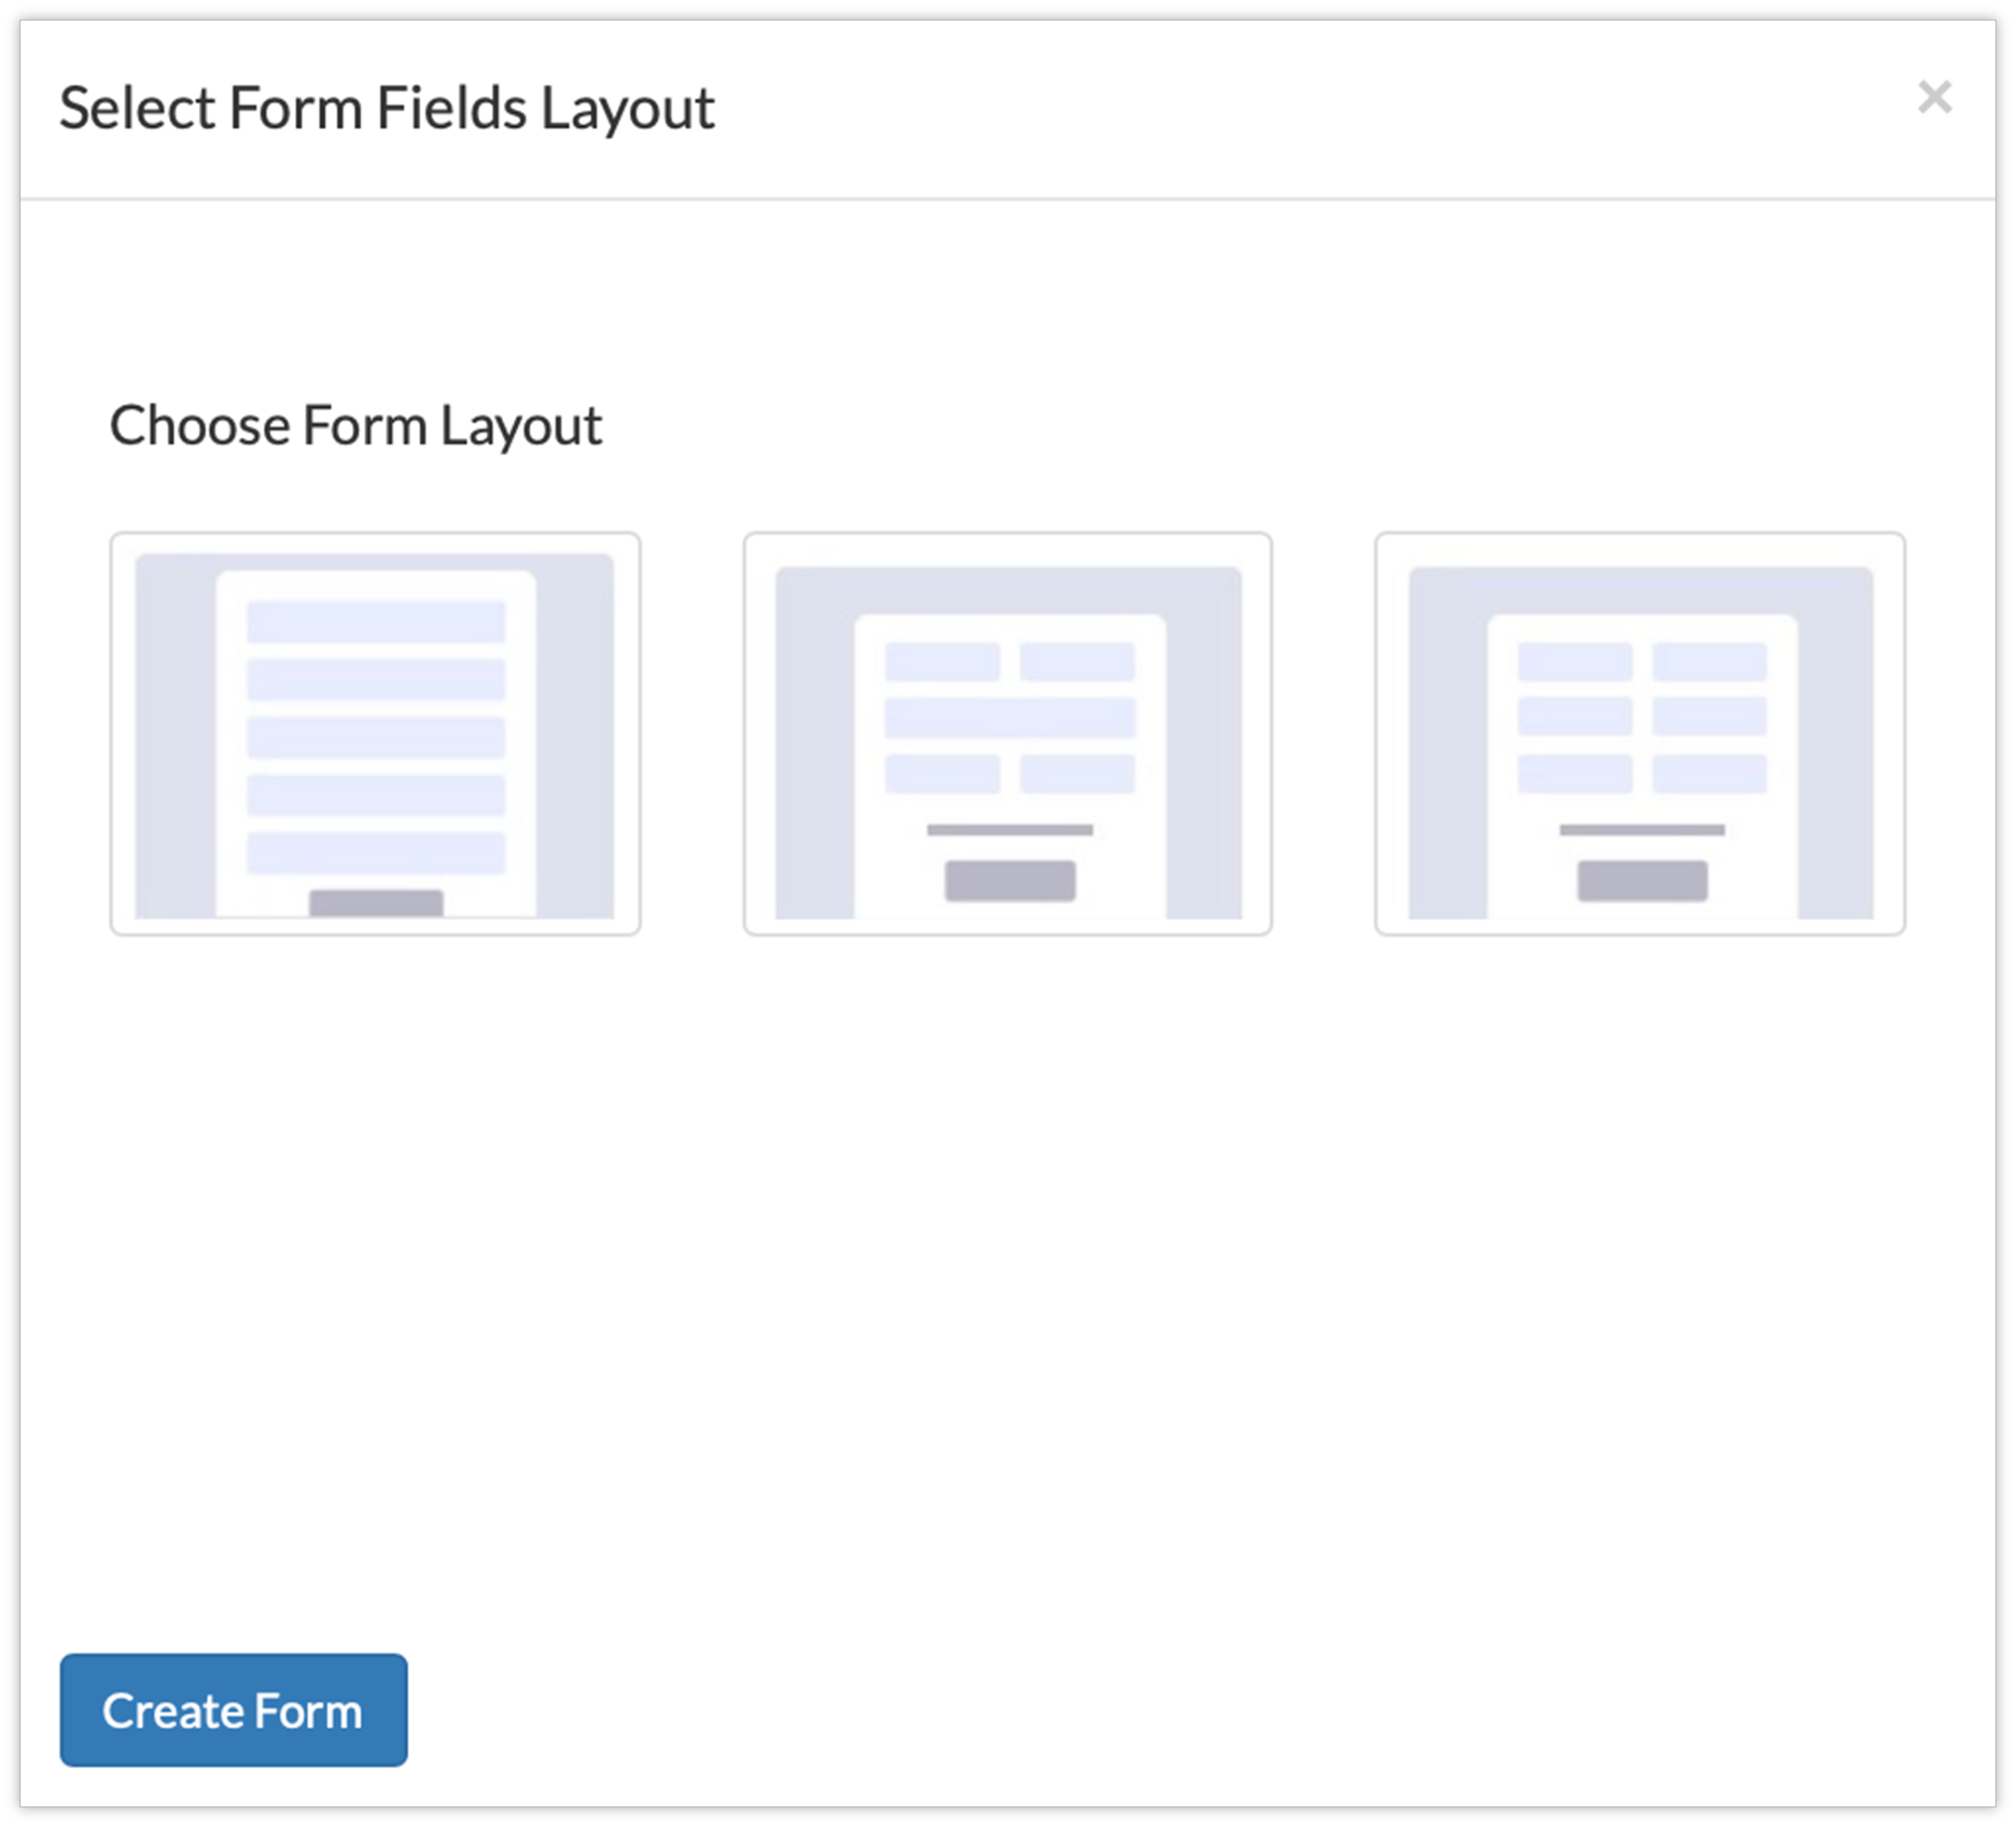
Step 3: A new modal shall follow where you will have to select the suitable form layout and then click on “create form” button.
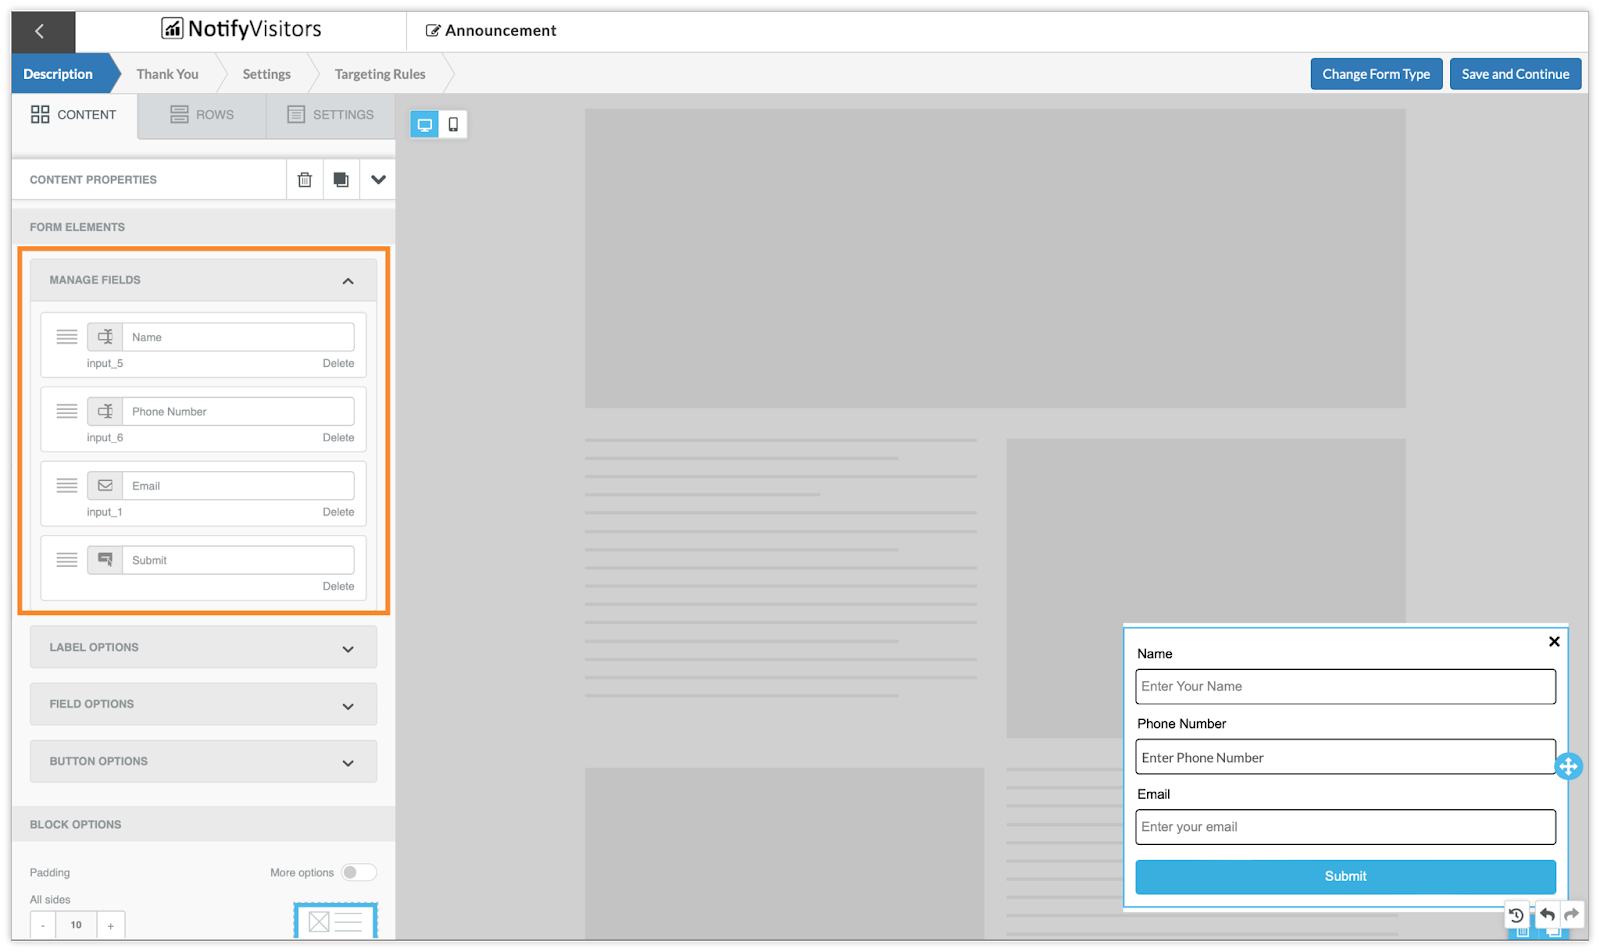
Step 4: Next, you’ll be presented with some default fields of a form, such as name, phone number, email, and the submit button.

If you want to add any additional fields, simply click on the “Add new field” dropdown and select your desired field. And in case you want to delete any field, simply click on the cross button available on the right side of the respective field.
To fill in the details in these fields, simply click on the “edit" button of the respective field, and you’ll be presented with the following options:

- Label: Enter a label for the particular field.
- Placeholder text: Enter instructional information to show users what kind of text should be filled in the placeholder, such as “Enter your name.”
- Map user attribute: This option is used to define which user attribute will be updated when user fills this field.
For example - If in the name field, we select “first name” from the map user attribute section, every text entered in the placeholder text box will be mapped as first name.
- Validation: This option lets you set rules for the input fields in your lead form, ensuring users provide accurate information. It gives immediate feedback, helping users spot and fix any mistakes in their entries. For example, you can restrict the name field to accept only alphabetic characters.
Click the dropdown menu to select your preferred validation type from these options:
- Alphabetic: Only letters are accepted.
- Numeric: Only numbers are accepted.
- Alphanumeric: Both letters and numbers are accepted.
- URL: Only valid URLs are accepted.
If you don’t want to apply any validation, just choose the “none” option.
- Required: This option allows you to mark this field as mandatory. If you checkmark this option, users will not be able to submit the form without filling in this field. Additionally, you can also show an error message such as ‘This field is required.’
Step 5: Now, click on “create form” and your custom signup form design will appear. To further enhance its looks click on the form, and a content menu will appear in the left panel.

Step 6: At first the menu shows the edit option, from here you can edit your form again if needed, and after this we have general options such as width, alignment,and font options for the form.

Step 7: Next we have form elements with various categories
a) Manage Fields - Under this you can move the fields up down by simply dragging up or down. You can also rename the fields, edit them, and delete as well.
b) Label Option - This offers you the options to customize your label’s text colour, font, spacing, position, etc.

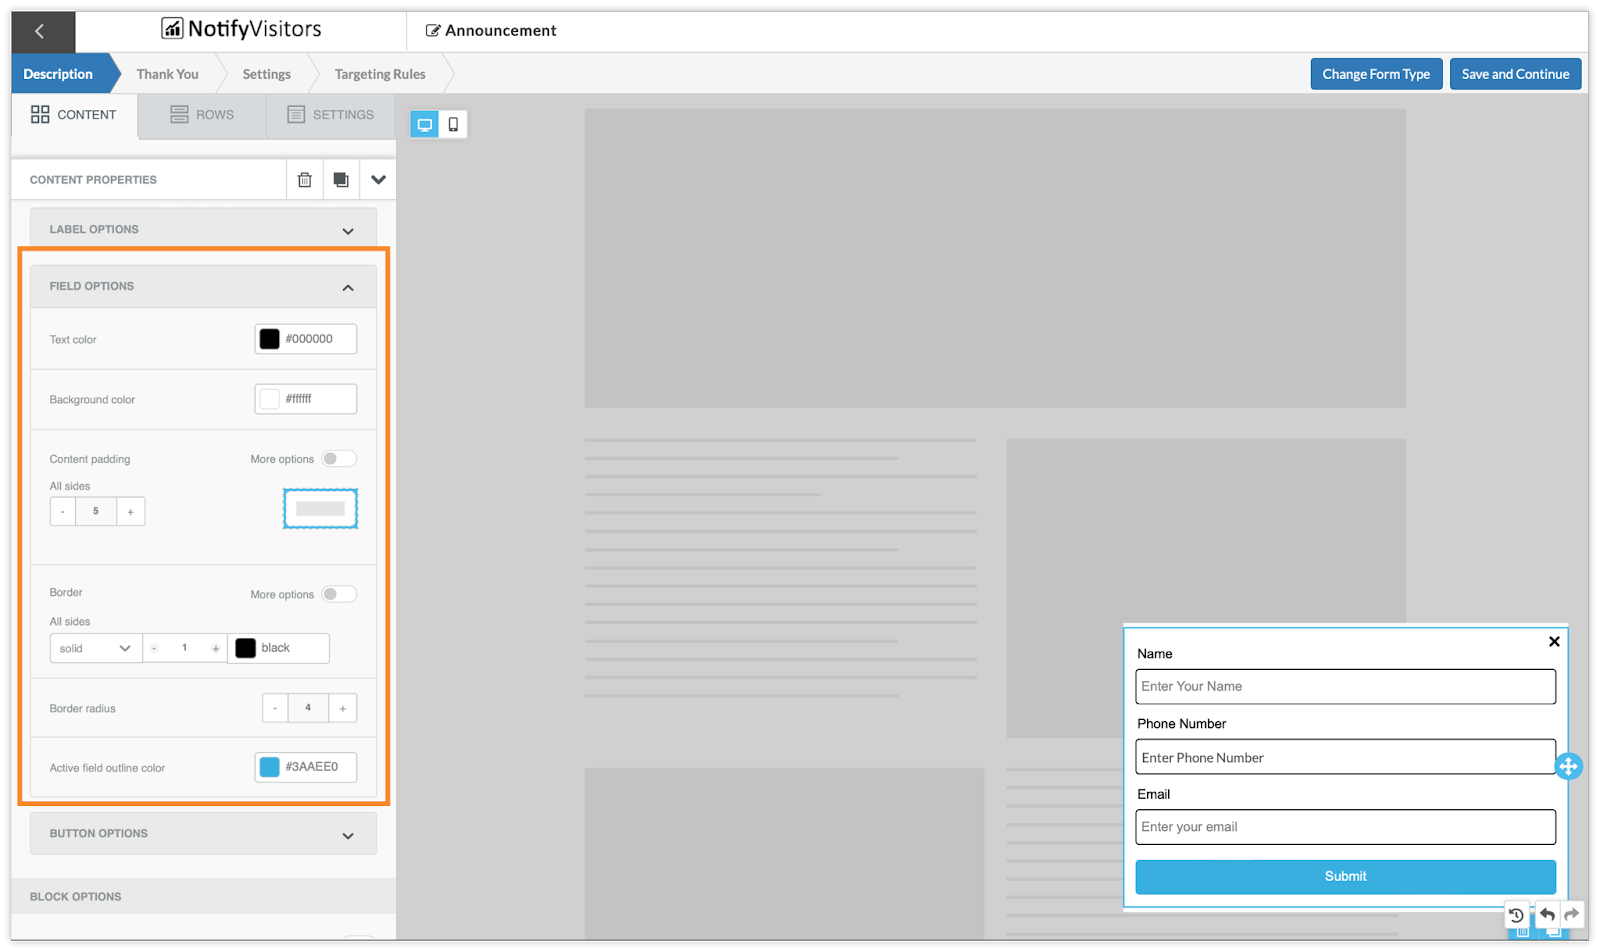
c) Field Options - From here you can change the background colour, text colour, border options, etc.
d) Button Options - Here you can customize the buttons of your signup. You can change width, text color, background color, alignment, spacing, etc. of the buttons.

Step 8: After you set up your form, you can use the block options at the end of the content menu to adjust the spacing of your sign-up form.

By following all these steps you can design your signup form. To further customize it i.e. adding background image, list, icons, etc. you can learn the remaining designing tools given in the description tab by clicking here.

In case you choose a predefined theme, the following modal shall follow where you can edit the form fields, customize them and manage its elements according to your wish.

At last click on “save and continue” to move to next step.

Thank You Tab
After clicking “save and continue,” you will be navigated to the Thank you tab where you will have to create a thank you message for the subscribers. Just drag and drop the text tool and enter a thank you message.
Next, add rows, images, buttons, and choose colours as per your preference, just like we did in the description tab.

Once done, click on “save and continue.”
Settings Tab
After clicking “save and continue,” you will next be navigated to this Settings tab. Here you have options such as double opt-in verification, page redirect, auto-close & close button timer, minimize option, along with various animations to choose from.
For double opt-in verification, if your form contains email and phone number field, you’ll get options for email verification as well as OTP verification, and if your form contains email, you’ll see only email verification option here, and similarly if your form contains only phone number you’ll see only OTP verification option here.

You can also design your double opt-in email template by clicking on the “edit double opt-in email template” link or click here to learn more.
Targeting rules tab
You will move to the Targeting Rules tab where you will have to set up targeting rules for your signup form campaign.
With this feature, you can target specific segments of your audience based on a variety of criteria, such as their location, device, referral source, and more. This allows you to create highly targeted campaigns that are more likely to resonate with your audience and achieve your desired results.
 To know more about targeting rules, please refer “How to optimize your onsite campaign with targeting rules”.
After defining the rules, click on Finish.
Review Tab
In this section, you'll find all the settings and rules you've established for your signup form campaign.

At first, we have the “Original form” area, which showcases the form name, type, labels, and all the key settings you've set up in the “settings” tab above, including segment, minimize button, colors, height, and more.
Next, we move on to the targeting rules section. This part details the essential targeting rules, such as leave intent targeting, visitor types, time spent in a session, Page URLs, and other criteria.
Then, we explore the advanced targeting rules section. Here, you'll discover information about runtime, source, device, browser, operating system, location rules, cookie rules, query rules, and any custom rules you've created.
Please note that while we've included all potential settings this section could cover, any features or settings you haven't activated will not be shown, making the interface more user-friendly. This also helps simplify troubleshooting any issues related to your signup forms.
Integration Tab
This section provides you with the ability to set up webhooks, facilitating real-time data exchange between your signup forms and various applications. When someone fills out a signup form, the webhook instantly transmits the collected information (such as name, email, or preferences) to a designated URL, ensuring smooth integration with CRM systems, marketing tools, or other platforms.

For a detailed guide on how to integrate webhooks into your signup forms, click here.
Preview your signup form
Once all done, you can take a look at your signup form to see how it will look on your website. You have the option to view your designed signup form on any site you prefer before making it live. This allows you to get a sense of how the form will function in real-time.
To preview, simply click the Preview button located at the top right.

A new window will pop up, allowing you to enter the URL of the website or page where you'd like to preview your signup form. You can also choose whether to preview the popup with or without targeting rules. Just check or uncheck the targeting rules option based on your needs. After that, just click on “create preview link,” and a link will be generated for you.

You can either copy this link to share with others or select “open in new tab” to check it out yourself.
Note: The preview link will be active for 7 days. If you'd like to access the form again after that time, you'll need to generate a new preview link.
Activating Sign-up form
Once you click on finish, you will be redirected to the signup forms list where you can see all the signup forms campaigns. You must activate the signup campaign to make it go live. Also, you may control the state of the sign-up campaign here to active or inactive as per your convenience.

Your sign up form campaign is ready to be viewed by your visitors.
Conclusion
Designing a signup form with NotifyVisitors Drag and drop tool is an effortless task. It facilitates in creating an appealing and user-friendly signup form through which you can easily achieve marketing goals. Thus, an effective signup form increases conversions and engagement of customers.
Was this article helpful?
That’s Great!
Thank you for your feedback
Sorry! We couldn't be helpful
Thank you for your feedback
Feedback sent
We appreciate your effort and will try to fix the article